After the last couple months of binge-watching shows on Netflix and trying my hand at baking, I was looking for something new to do that was a little more stimulating than staring at a screen, but not as troublesome as messing around in the kitchen. As I was scrolling through YouTube, I came across a needle felting tutorial, and decided to give the craft a try.
What Is Needle Felting?
I was pretty intrigued when I first came across the video. It seemed like the creator was conjuring cute animals just by sticking needles into coloured pieces of wool, but when I tried it with a regular sewing needle, I didn’t get the solid result I saw in the video. After a little research, I found out that the craft requires specific needles that are actually slightly textured and serrated. As you stick the needle into wool felt, the little grooves on the edge of the needle pull the strands of felt and this repeated process causes the wool to become more rough, eventually giving you the more solid form you need to make your figures.

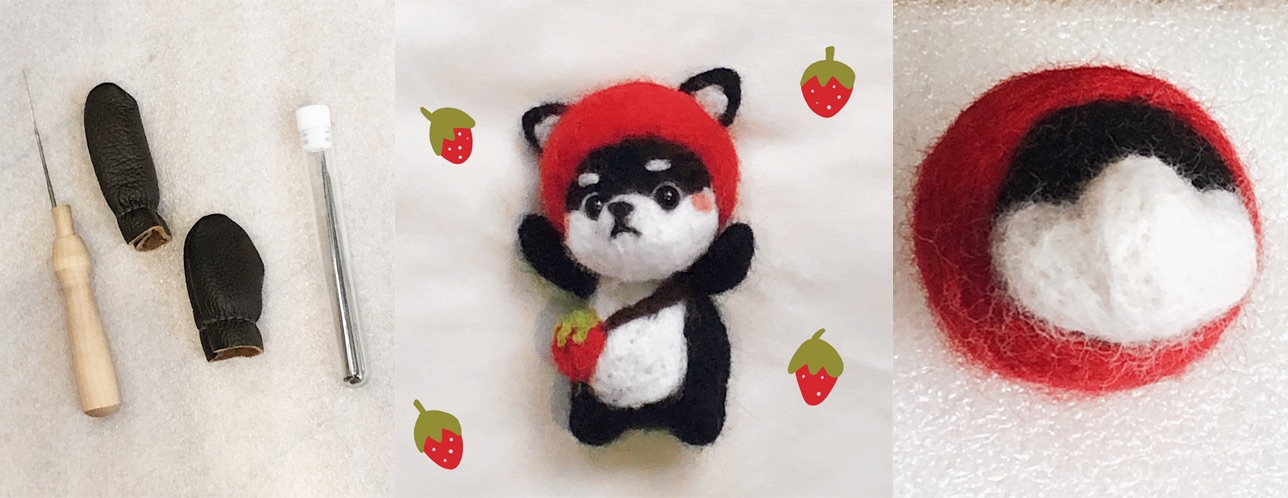
After a quick search, I discovered I needed three basic things — wool, felting needles and a felting base, which should be soft but sturdy, like a sponge or a piece of packing foam. I found an affordable needle felting starter kit that had everything I needed, but I also found a DIY set that I purchased as well.

The two kits arrived a few days after my purchase, and I was pleasantly surprised to find that they were of pretty decent quality, despite the low price point. I initially wanted to attempt to create a cute character from scratch, but after trying out the felting technique, I realised it would be much more difficult than I thought, especially since I didn’t know where to start. I decided to go with the DIY kit instead, to try and get my bearings for this new craft.
The DIY Kit

Within the DIY kit was almost everything I needed to create an adorable shiba inu. I was glad to have also gotten the needle felting starter kit, because that came with a wooden handle, giving the felting needle a better grip. One thing I regret not getting was a needle felting pen, which allows you to felt using multiple needles at a time, and that would have made the process a lot quicker.
The starter kit also came with two thumb and finger protectors, but after a few unfortunate pricks, I realised that they didn’t help much at all, apart from peace of mind before said injuries.
Process
Step 1: Making the head base

While the DIY kit came with instructions, they didn’t end up being very helpful. Although it listed step-by-step instructions and images on what to do, actually getting the job done was another story. The first step was to make the base of the head, which was essentially a black ball of wool. At first, I was pretty cautious about pricking myself with the needle, so I started off quite slowly, pricking the wool a couple times a second. After a while, I started to gain some momentum, along with some (naive) confidence — I sped up the process, but ended up pricking myself multiple times.

I ended up taking about 40 minutes just to create the base of the head. It honestly didn’t feel like it took that long, but I was also pretty focused on not sustaining anymore injuries. However, I also made it a little smaller than I should’ve, which made the rest of the task a bit harder.
Step 2: Creating the face

Adding the lower half of the face and the facial features were probably the most difficult part of this whole process. Because I had made the base a bit too small, it wasn’t easy trying to mold the snout and the cheeks, along with the tiny nose and mouth detailing.

As you can see, mine ended up being a little lopsided, but by this point I was just happy to have created a face. After a while, I decided to leave the grumpy expression as it was — I feel like it gives the doll a little more character.
Step 3: Adding body parts

Creating the ears was a little tough, but because I was molding them individually, it was easy to get them to be similar in size, and attaching them was straightforward. On the other hand, the body was much easier to make — I just had to make a square-ish torso, along with two feet, which I cut from an oval. The arms were doable as well — I just had to create two sausage-shapes and poke them in place.

Before adding the arms, I placed more white felt on the body — it definitely felt a bit more complete at this stage, and I was getting faster and was able to make better estimates for how much material I needed for each detail.
Results

I’m pretty pleased with the final outcome, especially considering the amount of time I put into it — it took a total of about 8 hours to complete the doll, not including the breaks I had to take to get more band-aids for my hands.
The entire process was much easier than I thought it would be, but also a lot more time-consuming. Needle felting is essentially a repeated movement of stabbing the needle into wool, and I gradually improved in speed and accuracy. The biggest change I would make would be to have made a larger base, because that would’ve made detailing much easier and probably more even.
3 Things I Learnt
1. Start small. It’s easy to build up your shapes and add material, but it’s almost impossible to remove excess material once it’s been felted in.
2. Be patient. It’s not the easiest craft in the world, but it’s also not the most difficult. Making basic shapes and the general needle felting technique is pretty easy to master, from my experience, but the harder steps are including smaller details and less traditional shapes.
3. Have a plan. If you’re making something from scratch, without any instructions, draw out the entire figure you intend to make, and separate it by part. Once you decide on which steps to do first, it gets much easier to handle than if you were just going at it with an image in your head.
Would I do it again? Probably. I have a bunch of wool and needles, and after completing this first doll, I feel like I did a pretty decent job. However, I feel like I should practice little details on a bigger piece of felt first, before trying to put them onto a rounded surface. Overall, I feel accomplished that I actually completed the doll, but I want to be able to create more complex things, and not have to refer to an instruction manual. My goal for next time? Get through it without pricking myself.


You must be logged in to post a comment.