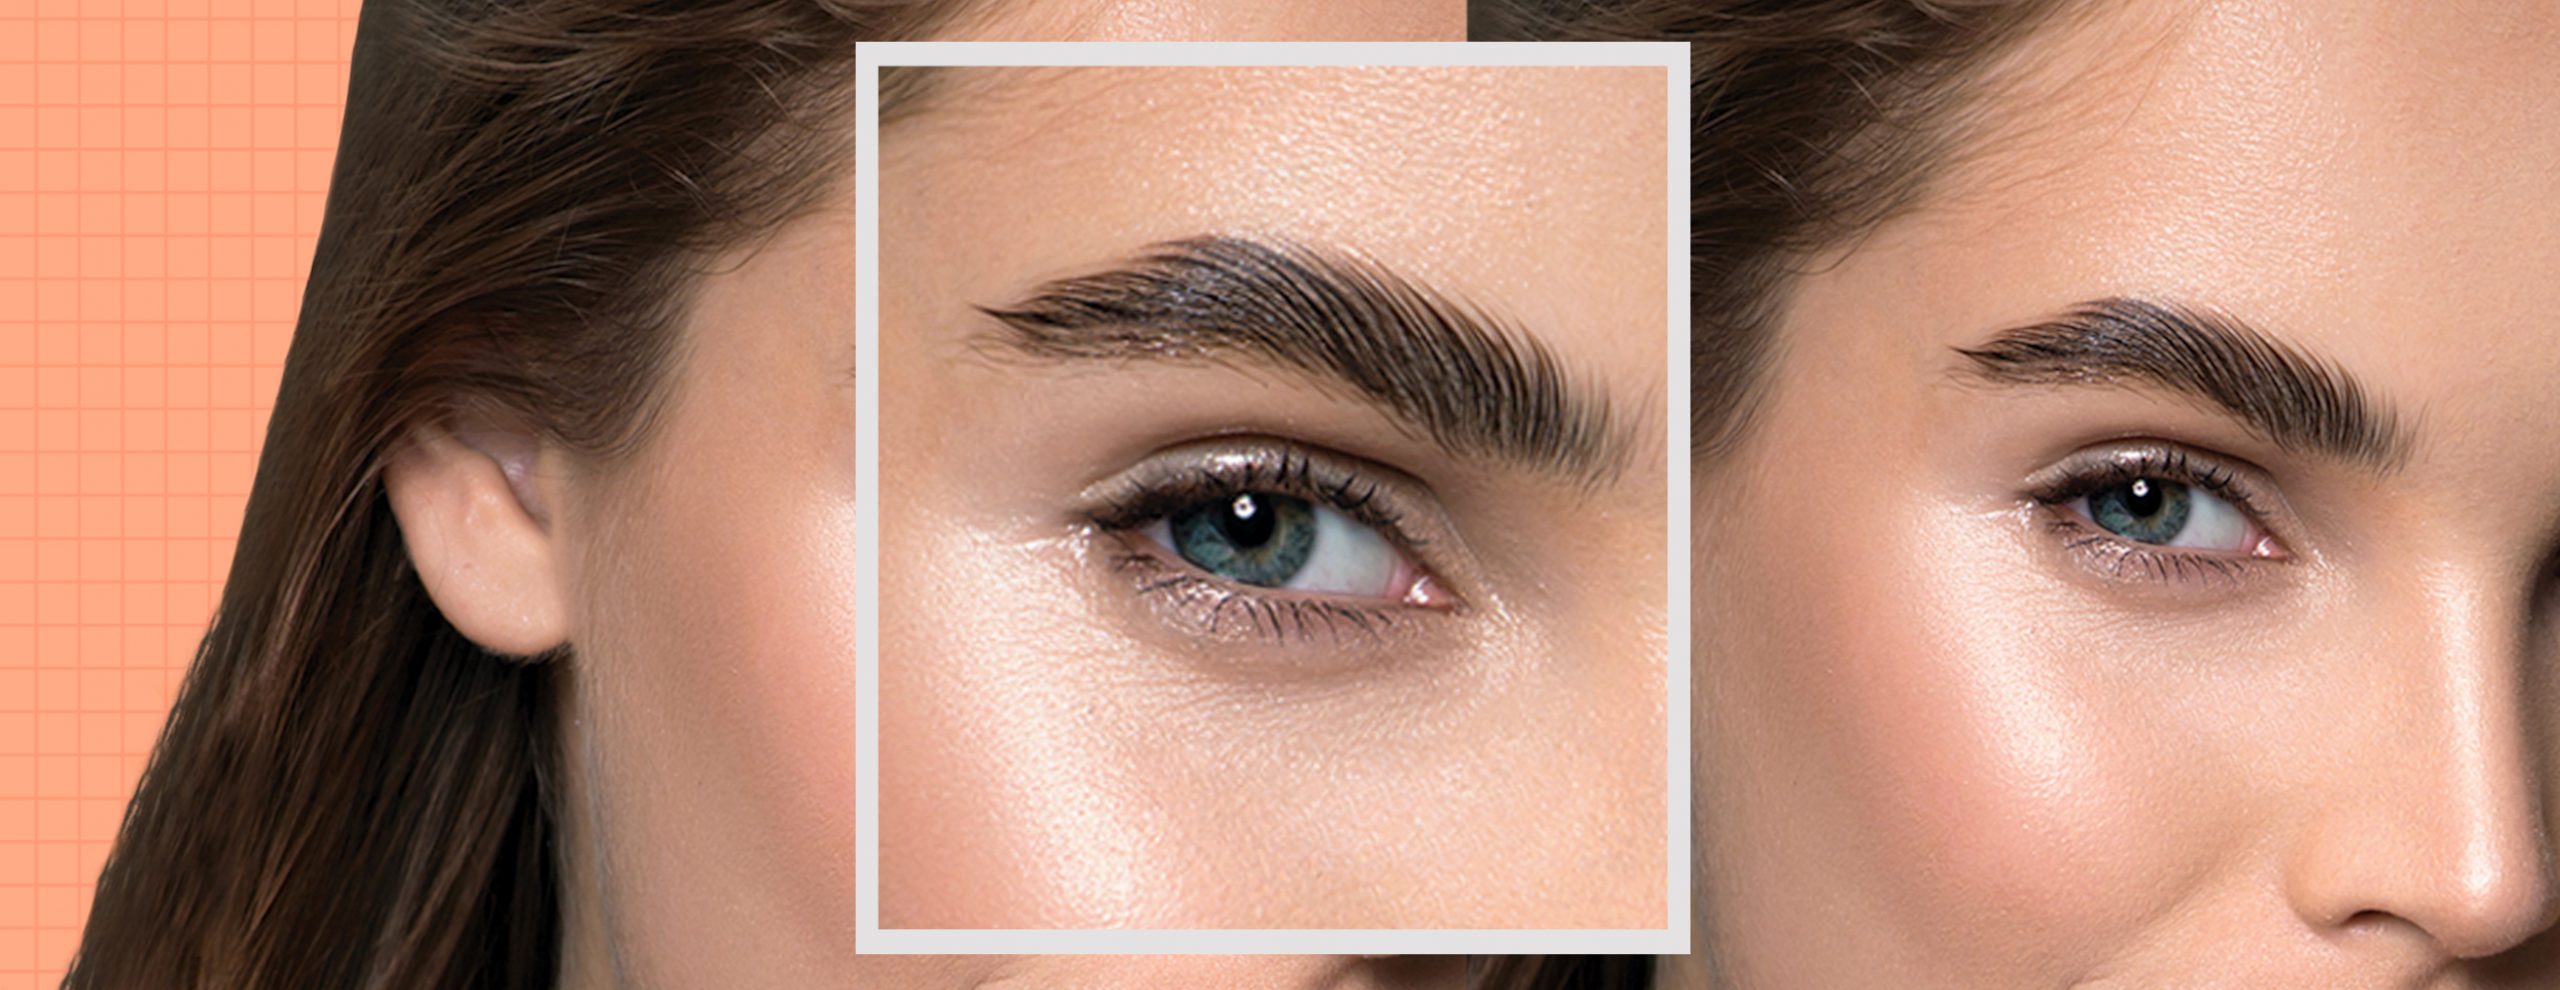
As the cliché goes, eyes are the windows to your soul, and if so, brows are mightily important to enhance those dreamy peepers. I’m a passionate believer in a pair of good brows, beyond them just being window drapes for our faces. Ever since my clueless teen years when I first got them plucked in preparation for prom, I’ve always noticed the difference neat, groomed brows make, whether it’s the subtle way they frame your face, or how they can perfect a makeup look.
It just so happens that thick, fluffy brows are in, not unlike the ones sported by celebrities Emilia Clarke and Kaia Gerber — and if those God-gifted, natural-looking brows are what you’re after, enter the hottest brow treatment in town: brow lamination.

What is Brow Lamination?
Popular in the US and UK, brow lamination is basically a perming treatment for your brows, one that restructures brow hairs into a set shape, for an extended period of time. The look? Full, slicked-up brows that look thicker, yet natural.
Homegrown brand Browhaus offers this service here, and tells us that the service is ideal to mask small gaps between the brows. Unlike Brow Resurrection, the beauty parlour’s other popular procedure, think of this like a perm, or a brow lift — it lifts, sets, and styles your brows, with effects that last up to four weeks. Commonly seen as a non-invasive alternative to microblading, this one doesn’t break into the surface of your skin, which means zero downtime as well.
With the service gaining in popularity, I had to try it for myself — with some pretty amazing results. Read on for a rundown of my entire 60-min procedure:
The Process

Before the procedure began, there was a quick consultation to determine if my eyebrows were suitable for the procedure. To achieve the ideal results of brow lamination, you’ll need to have a decent amount of brow hairs to begin with. For those with very sparse brows, or with bigger gaps in their brows, you might be more suited for Brow Resurrection.
I’ve always had pretty thick brows, so yes, I qualified. My key concern though, would be that my brows were too full, which, when brushed up, would create a frighteningly harsh effect. However, my brow therapist assured me that there was nothing to worry about — the look was natural and feathery, while she will also tweeze and cut my brow hairs after, if necessary.
Step #1: Lift

We first start off with a perming cream, one that’s applied with a q-tip then left on for up to 6 minutes. What the cream does is to soften the brow hairs, so that they can be brushed and styled into shape later. Similar to a hair perm, the cream breaks bonds in the hair for that restructuring process. I was also told that the perming cream will have a slight tingling sensation, depending on the sensitivity of your skin — I didn’t feel any itchiness or discomfort in the slightest though.

This was also when my brow hairs were brushed upwards, both to fill in the small gaps in between, as well as create a defined arch shape. Once the cream was applied, a clear plastic wrap was placed over my brows to allow the solution to penetrate.
Step #2: Set
Once my brows were in place, a neutralising cream was applied. This helps keep them in that desired full position, and “sets” the shape of the brows.
Step #3: Style

For this session, I opted for optional Brow Tint and Tweezing services as well, to tame any unruly hairs. My brows were therefore plucked to achieve a natural-looking arch, followed by a subtle brow tint that helped create a slightly fuller, feathery effect. The difference for the tint was very subtle, but the shaping definitely helped my brows look more polished and well-groomed. After that, my therapist went in with Browhaus’ Undercoat Lash & Brow Conditioner to nourish and condition my brows.
the finished look!

Immediate thoughts: I love it! The effect was instant, and I was very pleased with how feathery my brows looked after, without looking too thick too, as I had feared. Compared to how my brows were like before, my new set was visibly fuller with all those small gaps in between completely filled. They also look more polished and defined, though with a nice feathery effect at the front portion for a very natural look. Other than some slight skin redness from the tweezing, I could leave the beauty parlour and carry about the rest of my day. Best thing is — I did not need to use any (pigmented) brow product to keep them this way. For the next couple of weeks, all I had to do to style my brows was to go over them with a spoolie.
after-care

As mentioned, a typical brow lamination should last up to four weeks. There are also some after-care tips to take note of, namely, to wait 24 hours before exercising intensively, putting on brow makeup, or letting the brows come in contact with water, in any way.
Using a lash conditioner also helps the effects last longer, and I was advised to use the Undercoat Lash & Brow Conditioner both morning and evening. The brush applicator helps style the brows too — go over them in one direction and sweep them up for a dramatic effect, or angle the spoolie and follow your natural brow arch for a more subtle finish.

Overall Impressions

Uh, Instagram brows much? I absolutely love the effect, and was low-key boasting to all my friends after my brow lamination treatment — hopefully not in a narcissistic way though. I just couldn’t get enough of how my brows look so full and defined from just a simple perming procedure, and how natural-looking that effect was too. Literally: #iwokeuplikethis. Instead of obsessing over my brows with a brow pencil, for the first week at least, I could roll out of my bed with my brows looking this on fleek.
Some things I noted though: my brows did look a bit flatter from the side, which makes sense as the brow hairs are now “optimised” to fill up sparse spaces. That said, they still look awesome in pictures, totally indiscernible. They also felt more stiff than I was used to, and for the first few days, I was very careful about washing my face, making sure that water, my cleanser, or any other skincare product won’t be touching my brows. I did feel like I could afford to be less careful though, especially since the skin closest to the brows felt more dry than usual.
The after-care was as easy as promised, but you do have to be diligent about brushing your hairs with the brow conditioner daily — I certainly was since I wanted the brow lamination effects to last as long as possible. After about 1.5 weeks, my brow hairs started to turn up slightly unruly when I woke up, perhaps due to my shifting about when I sleep. Still, all I had to do was go over them with a spoolie to spring them back in place — this keeps them nice and neat for the rest of the day. I’m currently about three weeks in, and can still say that they’re still looking as fine as ever!
Browhaus’ Brow Lamination is available at all Browhaus outlets.
Brow Lamination: $120 per session
Brow Lamination + Colour Tweak (Brow Tint) + Tweezing: $160 per session
First trial promotion: $48 per session (including Tinting and Tweezing). Purchase trial on Beauty Emporium. Terms and Conditions apply. Promotion ends 31 December 2020.
Browhaus’ Undercoat Lash & Brow Conditioner, $65 for 8ml, available at all Browhaus outlets and via beautyemporium.shop.


You must be logged in to post a comment.